

Table of Contents
- Quick Comparison: Top 5 Pour Over Coffee Drippers
- How We Selected These Beginner Drippers
- 1. Hario V60 Plastic Dripper: Best Budget Starter
- 2. Kalita Wave 185: Most Forgiving Flat-Bottom Design
- 3. Clever Dripper: Easiest Immersion Hybrid
- 4. Chemex Classic Series: Best for Serving Multiple Cups
- 5. Bee House Ceramic Dripper: Best for Standard Filter Compatibility
- How to Use a Pour Over Dripper: Step-by-Step
- Frequently Asked Questions
Last Updated: September 22, 2026
Quick Comparison: Top 5 Pour Over Coffee Drippers
The best pour over coffee dripper for beginners is the Hario V60 Plastic, which costs about $10 and teaches proper technique without punishing mistakes too harshly. The Kalita Wave 185 suits anyone who wants consistency without fuss. The Clever Dripper works best for those who prefer steeping over pouring.
| Dripper | Starting Price | Material | Filter Type | Best For |
|---|---|---|---|---|
| Hario V60 | $10 | Plastic | Cone paper | Budget learners |
| Kalita Wave 185 | $30 | Steel or glass | Proprietary flat | Forgiving brewing |
| Clever Dripper | $35 | Plastic | Standard #4 | Immersion ease |
| Chemex Classic | $45 | Glass | Proprietary thick | Serving multiple cups |
| Bee House | $25 | Ceramic | Standard wedge | Filter compatibility |
How We Selected These Beginner Drippers
We picked drippers that minimize frustration during the learning phase. A good beginner dripper forgives uneven pouring, accepts widely available filters, and doesn't cost so much that a bad first week feels like wasted money.
The Filter Cost Nobody Talks About
The dripper is a one-time purchase. Filters are forever. Over a year of daily brewing, the filter you chose matters more to your wallet than the brewer itself. Here's the honest math, using typical online and grocery prices:
| Filter type | Typical cost per filter | Filters per year (1 cup/day) | Annual filter cost | Where to buy |
|---|---|---|---|---|
| Standard #2 cone (Bee House) | About $0.05-$0.08 | 365 | Roughly $18-$29 | Any grocery store |
| Standard #4 cone (Clever Dripper) | About $0.06-$0.10 | 365 | Roughly $22-$37 | Any grocery store |
| Hario V60 cone | About $0.07-$0.12 | 365 | Roughly $26-$44 | Grocery stores, specialty shops |
| Kalita Wave proprietary flat | About $0.12-$0.20 | 365 | Roughly $44-$73 | Mostly online |
| Chemex proprietary bonded | About $0.20-$0.35 | 365 | Roughly $73-$128 | Specialty shops, online |
Material Trade-Offs That Actually Affect Your Brew
Material isn't just about looks. It changes how stable your brewing temperature stays, which changes how your coffee tastes.
- Plastic (V60, Clever Dripper): Cheapest, lightest, nearly unbreakable, and, counterintuitively, the best heat retention of the common materials because plastic is a poor conductor. It won't pull heat out of your slurry. The downside is feel and long-term durability; plastic can stain and scratch. Look for BPA-free labeling.
- Ceramic (Bee House): Holds heat well once preheated, feels substantial, and stays put on the mug because of its weight. But ceramic is a heat sink, if you skip the preheat rinse, your first pour loses several degrees to the cold ceramic. It also chips or shatters if dropped.
- Glass (Chemex): Neutral in flavor, easy to clean, and lets you watch the brew. Poor heat retention unless preheated thoroughly, and fragile.
- Stainless steel (Kalita Wave): Durable, holds heat reasonably well, and won't break. Heavier than plastic and can be hot to handle without a collar or towel.
1. Hario V60 Plastic Dripper: Best Budget Starter
The Hario V60 is the dripper most coffee professionals learned on, and the plastic version costs around $10. Its spiral ribs and single large drainage hole give you full control over flow rate, which means you learn fast because you taste your mistakes immediately.
Pros:
- Cheapest way to learn manual brewing properly
- Replacement cone filters available at most grocery stores
- Lightweight and nearly unbreakable
Cons:
- Demands consistent pour technique from the start
- Plastic construction feels less premium than ceramic or glass
2. Kalita Wave 185: Most Forgiving Flat-Bottom Design
The Kalita Wave's flat-bottom design with three drainage holes reduces channeling dramatically. Water distributes more evenly across the coffee bed, so uneven pouring matters less. At around $30, it's a reasonable step up for anyone who wants good results without obsessive technique.
Pros:
- Flat coffee bed promotes even extraction
- Three-hole drainage resists clogging
- Stainless steel version holds heat well
Cons:
- Proprietary filters add ongoing cost
- Less control over flow rate than the V60
3. Clever Dripper: Easiest Immersion Hybrid
The Clever Dripper combines immersion brewing with a paper filter. You add coffee and water, let it steep, then set the dripper on your mug to release the brewed coffee through a shut-off valve. It's nearly impossible to ruin a cup this way.
Pros:
- Uses standard #4 cone filters from any grocery store
- Consistent results with minimal skill
- Low learning curve
Cons:
- Less control over flow rate than percolation methods
- Plastic body, though BPA-free
4. Chemex Classic Series: Best for Serving Multiple Cups
The Chemex is a glass carafe and brewer in one piece, starting around $45. Its thick bonded filters produce an exceptionally clean cup with no sediment, and the design looks good enough to bring to the table.
Pros:
- Brews up to 8 cups for serving guests
- Doubles as an elegant serving carafe
- Produces a bright, sediment-free cup
Cons:
- Proprietary filters cost more than standard options
- Glass breaks if handled roughly
5. Bee House Ceramic Dripper: Best for Standard Filter Compatibility
The Bee House is a wedge-shaped ceramic dripper that sits stably on most mugs and uses widely available #2 cone filters. At around $25, it's a solid middle ground: sturdy, simple, and compatible with filters you can grab anywhere.
Pros:
- Fits standard #2 cone filters
- Ceramic retains heat well
- Stable base prevents tipping
Cons:
- Heavy compared to plastic options
- Ceramic can break if dropped
How to Use a Pour Over Dripper: Step-by-Step
A pour over coffee ratio of 1:16 is the standard starting point: one gram of coffee to sixteen grams of water. For a single 12-ounce cup, that means roughly 22 grams of coffee and 350 grams of water. Weigh both. Volume scoops vary too much between bean shapes and roast levels to trust for a beginner's first month.
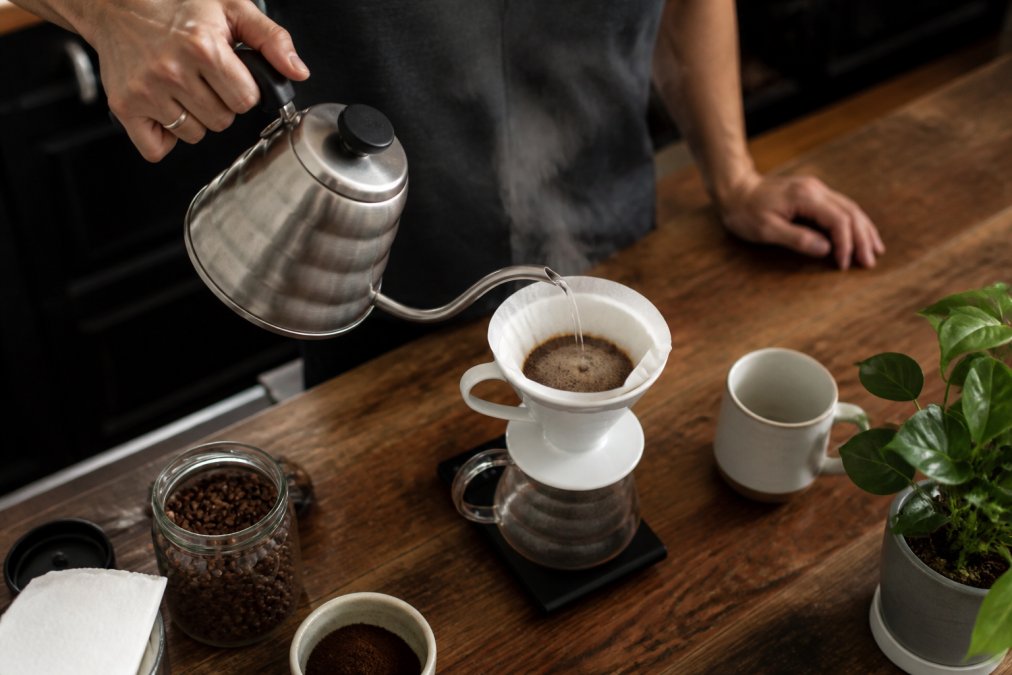
Here's the process:
- Heat water to 200°F. Just off boiling works if you don't have a thermometer. Water above 205°F tends to pull harsh, bitter compounds; below 195°F tends to leave the cup sour and underdeveloped.
- Rinse the filter with hot water, then discard the rinse water. This removes paper taste and preheats your dripper so the first pour doesn't lose heat to cold ceramic or glass.
- Add ground coffee to the filter and shake gently to level the bed. An uneven bed is the single most common cause of channeling.
- Bloom the coffee. Pour about twice the coffee's weight in water, wait 30-45 seconds. The coffee will bubble and expand as it releases carbon dioxide. If it doesn't bubble much, the beans are likely stale.
- Pour in slow circles from the center outward, keeping the water level steady. Total brew time should land around 2:30 to 3:30 for a single cup.
- Let it drain completely before removing the dripper. If it stalls past 4:30, your grind is too fine or your filter is clogged.
Dialing In Grind Size Without a Reference Photo
Grind size is the variable beginners get wrong most often, and it's the one that's hardest to describe in words. The National Coffee Association's brewing guidance notes that water temperature and grind size affect extraction more than any other variable. Here's a practical way to calibrate by feel and by taste, since you can't see what a competitor's photo is showing you:
- Medium-fine (the starting point for cone drippers like the V60 and Bee House): rub a pinch between your fingers. It should feel like table salt, slightly gritty, but with no sharp edges. A burr grinder set to about the middle of its espresso-to-French-press range usually lands here.
- Medium (the starting point for flat-bottom drippers like the Kalita Wave): feels like coarse sand or kosher salt. Slightly more resistance between your fingers than table salt.
- Medium-coarse (the starting point for the Chemex): feels like sea salt or raw sugar. Distinct grains you can feel individually.
Fix Your Brew: Bitter vs. Sour Troubleshooting
Most beginner frustration isn't the dripper, it's not knowing which direction to adjust. Use taste as your signal:
| What you taste | What it usually means | First fix | Second fix |
|---|---|---|---|
| Harsh, dry, bitter, ashy | Over-extracted | Grind coarser by one or two clicks | Lower water temp to 195-198°F |
| Thin, sharp, sour, salty | Under-extracted | Grind finer by one or two clicks | Raise water temp to 202-205°F |
| Both bitter and sour in the same cup | Uneven extraction (often blade grinder or channeling) | Improve grind consistency | Slow your pour and level the bed |
| Weak and watery but not sour | Too little coffee | Increase dose to full 1:16 ratio | Check that your scale is zeroed |
| Muddy, silty, slow drain | Grind too fine or filter clogged | Grind coarser | Rinse filter more thoroughly before brewing |
Frequently Asked Questions
What is the best coffee pour-over kit for beginners?
A complete beginner kit includes a dripper, paper filters, a gooseneck kettle, a digital scale, and a burr grinder. The Hario V60 Plastic Dripper at around $10 is the most affordable entry point, while the Clever Dripper at around $35 offers the lowest learning curve because its shut-off valve handles immersion brewing automatically. Pair either with freshly roasted beans and a scale that measures in grams for consistent results.
Do I need a gooseneck kettle for a pour over dripper?
A gooseneck kettle gives you control over water distribution and flow rate, which directly affects extraction evenness. Without one, you can still brew pour over coffee, but you may struggle with channeling and inconsistent saturation of the coffee bed. For beginners, a basic gooseneck kettle is worth the investment because it removes one variable while you learn pouring technique.
What is the difference between ceramic, glass, and plastic drippers?
Ceramic drippers like the Bee House retain heat well but are heavy and can break if dropped. Glass options such as the Chemex offer a clean look and flavor-neutral brewing but are fragile. Plastic drippers like the Hario V60 are lightweight, durable, and affordable, making them ideal for beginners. Material affects thermal retention and durability more than flavor, so choose based on your budget and handling preferences.
Which pour-over dripper is the most forgiving for new users?
The Kalita Wave 185 and Clever Dripper are the most forgiving options. The Kalita's flat-bottom design and three-hole drainage minimize channeling, so small pouring mistakes matter less. The Clever Dripper uses immersion brewing with a shut-off valve, meaning you steep the coffee and release it all at once, which produces consistent results with very little technique required.
How do I choose the best coffee beans for pour over?
Look for freshly roasted, specialty grade beans with a roast date printed on the bag. Light to medium roasts highlight the bright acidity and complex tasting notes that pour over brewing excels at revealing. Single-origin beans from Ethiopia, Colombia, or Kenya work particularly well. Grind them fresh with a burr grinder just before brewing for the best extraction.
The gear matters less than the beans, and stale coffee ruins even the best dripper. Lux Brew Coffee Co. roasts every batch to order and ships within hours, so your beans arrive at peak freshness. Our specialty grade coffee comes from ethical family farms, and we offer single-origin selections and blends suited to any brewing method. Get started with Lux Brew Coffee Co. and taste what fresh roasting actually does for your morning cup.